Pressing flowers – A guide

I’ve been talking quite a bit recently about my newly found love of pressing flowers. It’s not really newly found as I remember the sheer delight when I was younger of opening up my mums flower press and seeing all the beautifully preserved delights inside and I got a press a few years ago that I had popped a few bits and bobs into and then promptly forgot about them.

It’s no secret that flowers are some of my favourite things and I will happily spend as much time as I can looking at them, taking pictures of them and arranging them around my home. My mum and I were meant to be going to the Chelsea Flower Show next week for the very first time (for me) and I’m so sad I won’t get to go along. I definitely plan on going next year (as long as Corona is under control!)

So about a month ago and in full lockdown decluttering mode I found my flower press. I opened it up and found a beautifully preserved chrysanthemum, some Japanese anemones and a couple of daisies. I felt sad there that it was so empty so decided to remedy this. I gathered some blossom from the garden and carefully positioned the flowers on the plotting paper and excitedly placed another sheet on the top and encased them in card before screwing shut the flower press excited to check on the results.

I was really disciplined and patient (not like me at all) and waited a whole week to open up the press again and like a child opening a present peeled the blotting paper apart to see the results. I was so very happy with what I found.

The flowers had been beautifully preserved and yet still were scented. The details were beautiful and I was so chuffed I had come across the flower press again. It gave me an idea of using pressed flowers to make Christmas presents as I like to make homemade gifts and think it offers a really personal touch. So I decided that I would press more flowers to see which ones worked best and make some prototypes with Christmas gifts in mind.

We are really lucky that the walk we have been doing in the lockdown is full of all manner of wild flowers. Many which are classed as weeds but it occurred to me that actually they were abundant and were delicate enough that they would work well in the press. You have to be careful of course as some wild flowers are poisonous or shouldn’t be picked but things such as buttercups and cow parsley are plentiful at the moment and as so many see them as weeds (not me, I think they are lovely) I picked some on our walk to press and was very keen to see the results.

I wasn’t disappointed. The cow parsley in particular presses really well and I was in a position to make my first gift. I decided that tea light holders would be a great place to start and found a glass jar that I had that had previously housed paper clips. The idea that by sticking pressed flowers around the outside that when the candle light is glowing inside it will shine through the pressed blooms. I used PVA glue and had to be very careful as the flowers are ever so delicate when pressed and got to work at gluing my flowers to the jar.

I was really chuffed with myself until I went to put a tea light into the jar and realised it was just too small for one to fit in! Epic fail! However it showed how the idea worked in theory and even just as a little vase it turned out really well and I think you will agree it’s very pretty. I thought that you could also use them in glass hanging frames or on paper mache bowls. The possibilities are endless!

So as I have continued with project press all the flowers I shared some pictures to my Instagram account and received some lovely comments and lots of questions about the best way to press flowers. I quickly filled up my one small press so decided to order another and write a blog post about how I use the press and the flowers I have found that work best.

You don’t need to buy a press at all. I have used thick books in the past and put the flowers between the pages. I did though often forget which books had flowers in and spent an awful long time once hunting for a four leaf clover that I knew was in one of the many books I own I just couldn’t remember which one! You can also use pieces of wood and paper and card that you have at home. By using the wood as the top and bottom layer and cutting up squares of card from cardboard boxes and placing paper between the sheets with your flowers in. You would need a weight of some kind to put on top or if you are good with tools you can drill holes for bolts so that the press can be bolted shut to press the flowers. I’ve had lots of questions about the best paper to use also. Blotting paper I have found is best but it’s more expensive. However it can be reused so has some value for the money. You can use regular paper or kitchen towel. I found regular paper was okay but as the flowers give off moisture while being pressed the flowers tended to get stuck to normal paper a bit more so you have to be that bit more careful when you remove them from the press.

My newest press came from Amazon and was £16. It came with the wooden press, bolts, seven sheets of card and twelve sheets of blotting paper included which I thought was good value for money. There are lots of presses available and the prices differ so I am not recommending a particular one. Have a look and see what suits you best.

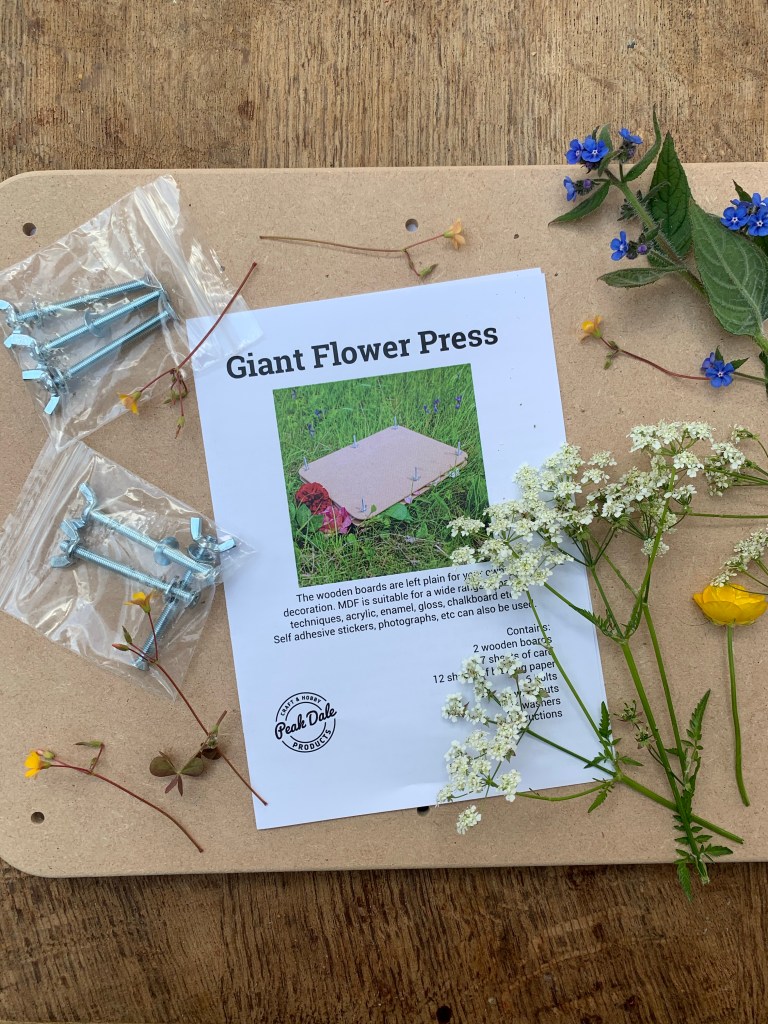
This new one has six bolt holes and you thread the bolts through before you start pressing so you don’t risk losing flowers after you start putting them in place on the paper. You lay out a sheet of card and on top of that a sheet of blotting paper. On top of the paper as above you can lay your flowers out. You need to remember that they will spread out as they flatten and that they will also give out moisture so you need to give a little room between each flower so that they don’t get stuck together as they are pressed. Once the flowers are laid out you need to pop carefully another sheet of blotting paper on top and then another piece of card on top of that. This layer system is the same as you fill up the press with layers of card between each ‘bundle’ of blotting paper. When you are ready you place the wooden top over all of the cardboard and thread the bolts through the holes. You then use the wingnuts (provided with the press) and twirl them onto the bolts. These then get tightened so that the press is pushing onto the flowers and the magic can begin. You have to be careful not to do it up too tight as it can make the wood buckle and the press won’t be so effective.

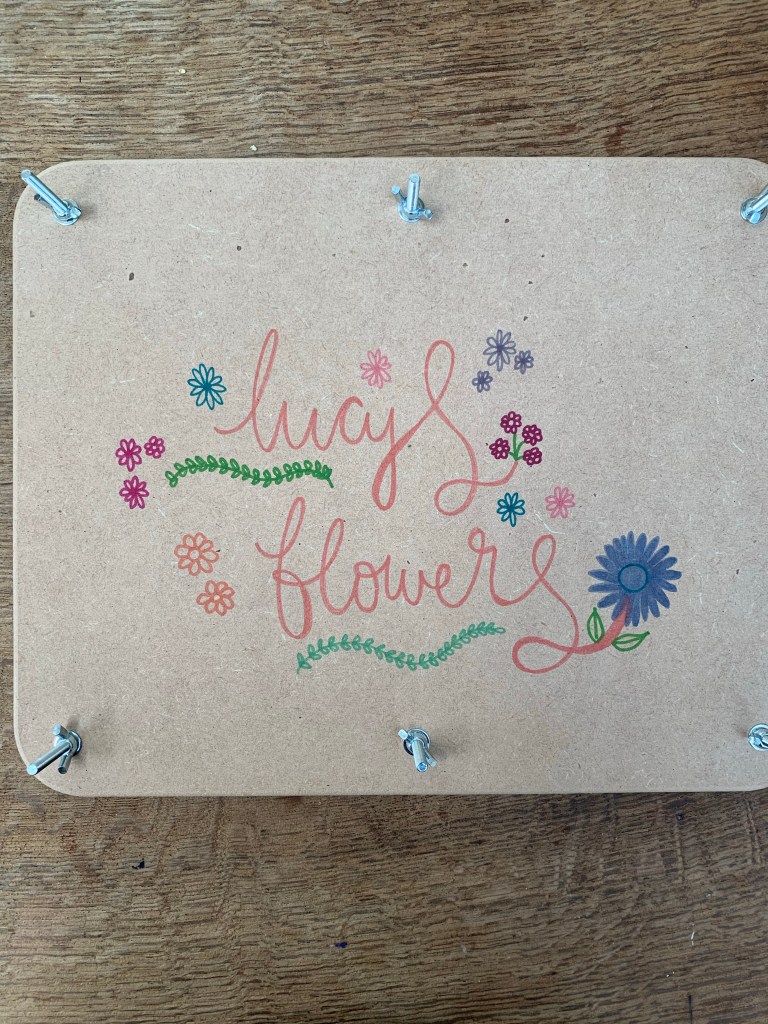
This new press came with bare wood for you to decorate however you like. I have used sharpies to personalise mine but you could paint it, use stickers or decoupage as you fancy. You then need to be patient and wait for the press to do its thing. I am awful with being patient and usually only manage about three days before I have a peep. About a week is best for small flowers and you will have some lovely pressed blooms ready for you when you open up the press.

These flowers are on about day four and are well on their way but not quite ready.

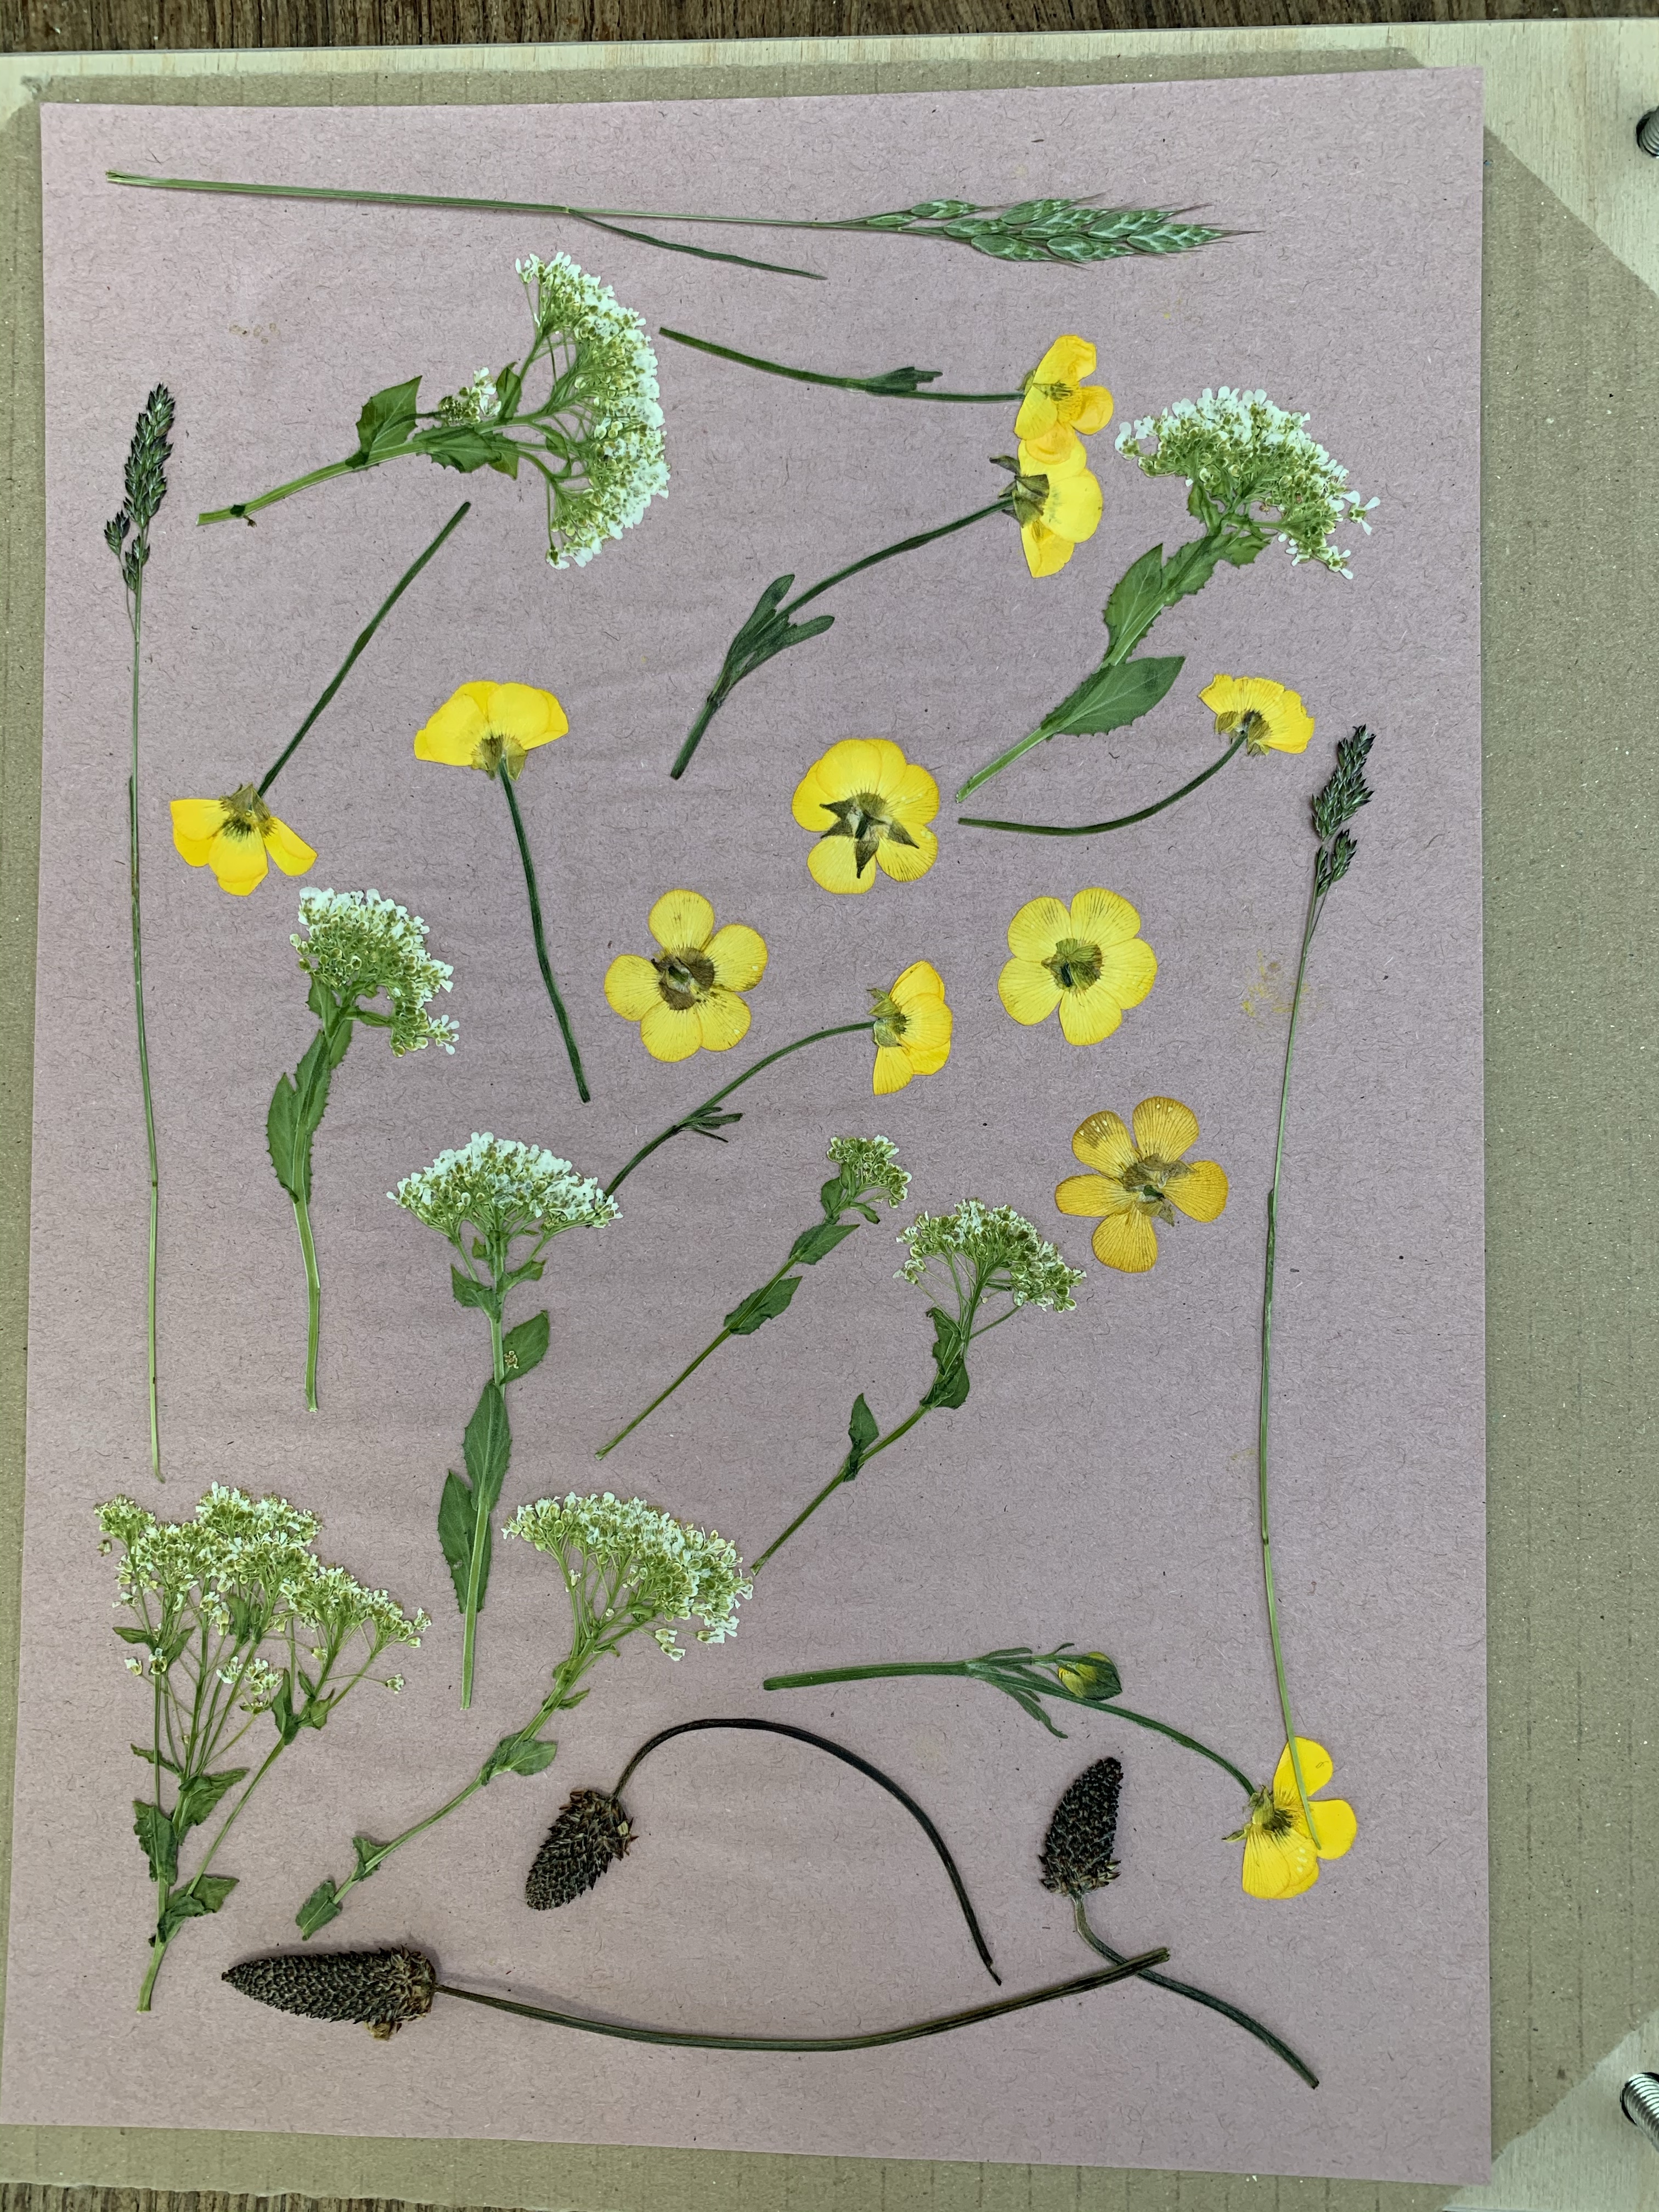
These are more than a week pressed and you can see how lovely the result is. I would say that the best flowers I have found are generally flat to start with. You can press thicker flowers but the finished result isn’t quite as well defined and they take much longer to dry. Small flowers are working best for me and anything that is delicate seem to give great results. Cow parsley, forget me nots, daisies, buttercups, blossom, hydrangea flowers, lavender and lots of grasses are working really well and give very pretty results. I have tried some purple salsify this week which is a wild flower a bit larger in size and although pretty the results as you can see aren’t quite as lovely as the smaller more delicate blooms.

You can see on this image also the way that the blotting paper absorbs moisture from the flowers. I would also say that a top top is to add additional layers to your press by using the card box idea. I have added four layers to my old press by cutting A4 sized card to use as additional layers. It’s the same as the card in the flower press anyway and we all have boxes that can be reused for this purpose.

The thing I love about pressing flowers is that there is no right or wrong it’s all about trial and error. You can try any kind of flowers you like and as long as you have patience will see some lovely results. I think I am loving the small delicate blooms because they press quicker but there will be larger flowers that I will explore as time goes on. You don’t have to spend a fortune on flowers and can forage some beauties for free. Please don’t though pick from peoples gardens or from floral displays. You won’t be popular and when there are so many lovely wild flowers around you really shouldn’t need to!

It’s also a fab activity to do with little people. I have boys as you know but they have both started suggesting flowers they think we should try and press and have picked some cow parsley with me to press this week. In these times of home schooling you can make some great artwork with pressed flowers and also examining them under a magnifying glass is a great activity too.

Pressed flowers are also being used in decoration and if you are an Escape to the Chateau fan there is a fab episode where Angel presses large flowers from their walled garden to use on the walls in the Potagerie suite in the chateau. The results are beautiful. Although I don’t have a chateau (I want one) or a walled garden (I want one) I love that I am doing similar on a smaller scale. I would love it more though if I did have a chateau so if anyone knows of any going cheap give me a yell!

I hope this has been a useful guide. I would love if you have any questions or are going to give it a try yourself for you to get in touch. I will also update as I do more pressed flower crafts to give some ideas of what you can do with your pressed flower treasures.

Take care, Lucy xxx

S**t, I am actually a grown up…….

There are moments in all of our lives that cause us to stop and have realisations about who we are as people. I have experienced these moments like many others at key points in my life such as when I got married, bought a house, had the boys etc. These things all made me realise that I am growing up, maturing and becoming an actual adult.

You then seem to forget all that and just get on with it and find the days and weeks flying by before the next realisation hits you. This last couple of weeks I think I have felt the most grown up I ever have. For so long now we have planned on extending our house. We have had no idea what we are doing and yet have slowly managed to get plans, permissions, quotes, surveys and all manner of other building type terms that I can’t recall.

We found our builder and work was scheduled to start in Spring which at the time seemed like a million years away. Fast forward what seems like twelve minutes and all of a sudden Spring was here (well ish, stupid snow) and it was time to begin. You can imagine that we were as usual ill prepared so spent a week clearing out the old, damp conservatory which we filled with essentials such as the tumble dryer, toys, unwanted furniture from my many moves around and of course wine. Trouble is all of that needed to go somewhere so we then had to make space, recycle, condense and move everything out. My best idea was that I would be a great help by drinking all the wine. Karl didn’t seem as enthusiastic about this as I was though. Odd.

Anyway we managed it and Day one arrived. Armed with rolls, 7000 tea bags, bacon, biscuits and our most smiling faces the builders arrived and the conservatory was no more in less than half a day. We then had the start of this week where the actual build bit commenced. The trouble was I was on lates and Karl was on early shifts which meant solo parenting for the one of us who was home and all the ordinary responsibilities as well as dealing with the build.

Now I imagine you are thinking, hold on Luce, you aren’t building the place yourself and the answer is no I’m not. I would be awful at building and we would end up with a big mess. I was however the grown up here to make decisions. Decisions about patios, measurements and to answer questions about topics I know nothing about like coving, mud and trenches. I was in consultation with Karl but I really didn’t like the pressure.

On day one all went well, I got the kids to school with no massive issues, had a shower and got dressed before the builders arrived so there were no awkward flashing moments, did all the washing up, cleaned the kitchen, made bacon rolls, cups of tea and bought a biscuit tin which I filled with chocolate digestives for their elevenses. I did however do the kitchen jobs dancing to Dua Lipa who was playing loudly on my IPod and it was only when I went outside to deliver said bacon rolls I realised I could be seen dancing in only the way I can. So perhaps not such an accomplished grown up after all! We also shouldn’t mention when the builder turned up and told me that he was pleased the delivery had arrived and I told him we hadn’t had any deliveries and then for him to point at the giant digger that someone had parked on my driveway without me seeing or hearing. As if we do mention it I come across very badly!

Under the floorboards in the old conservatory we found a copy of the News of the World from June 1966 which although discoloured is in perfectly good condition. We also found a message etched into the concrete from the owner of the house before us who moved in with his wife when the house was built in the sixties, raised a family here and then sold the house to us I think to go and live with family who could care for him after his wife died.

I thought for a moment that he would probably be sad with the changes we are making but then it occurred to me that we like him are raising a family. A family that consists of two boys who eat anything and grow it seems at lightening speed.

Today being my first day off this week it has been nice to just watch how the builders are getting on, to take in the new and to let it hit me that I am a grown up. A dancing around the kitchen, awfully organised, do it all by the skin of my teeth grown up. I did get to work yesterday and after about an hour realise that I hadn’t done up the zip on my ankle boots but I’m chalking that down to tiredness!

Being grown up is an incredibly scary thing, it’s pressured, it comes with bumps in the road (or in our case storm drain pipes where the footings should be) and it tests you and your limits. It’s also amazing as you can be in charge of your own destiny, you can provide for the people you love and you can make positive decisions for their benefit. In this case the boys getting their own rooms so they don’t kill each other.

I have often thought that I would love to go back to my teenage years, to start afresh and not make all the mistakes, to learn the lessons sooner and to appreciate it more. I do though like the idea that 34 year old me is making the memories that one day I can write in the concrete about. Even if I am making them with the addition of some wrestling, screaming children and disagreements with Karl about where the log burner should go.

I will probably bore you to tears with the extension but if you are interested keep checking back for progress. You know there will be some comedy gold moments along the way!

Lucy xxx

The world’s most vintage fireplace……

Hi all, how are we? 

As many of you who follow my ramblings on Instagram and Facebook will know we have finally commenced the first stages of project extension.

When we bought our two bed bungalow back in 2015 we knew we would outgrow it however we looked beyond the here and now. As two beds went it was quite a large one and the large driveway and big back garden (plus the stunning view with cows) were all something we knew we would struggle to get elsewhere in Whitstable. Property prices are through the roof and we simply couldn’t afford an extra 100k (not many of us can!) 

So the plans were made for extending the house at some point and creating not only more living space but extra bedrooms also. One of the first jobs we always knew we would have to tackle was this bad boy. 

Which believe it or not was our boiler. When we first viewed the house which had been renovated throughout we just couldn’t understand why they would keep such an ugly fireplace when it had a lovely modern kitchen and bathroom. It was only when we asked some questions that we realised that it was actually a back boiler with electric fire surround (and sexy mood lighting as you can see). We got some quotes and realised that we would likely have to make do with it until such a time as we could afford to get it replaced (around 4K).

Initially I had lots of plans to cheer it up, a bespoke wooden surround for example but this wasn’t possible because of the potential build up of carbon monoxide so I then decided to wall paper it. Realising I didn’t have the patience of a saint I then got creative with washi tape and it became a multicoloured delight (can you sense my sarcasm there?!) I finally painted the surround and the hearth in chalk paint which was the best it had looked in a while! 

I did always like using the shelves and the hearth for displaying my stuff, anyone who knows me knows I love a bit of clutter but alas I did find the boiler a bit embarrassing and always felt that it detracted from the other lovely things in the room. When we got the plumber round to talk about our options he told us that it was such a shame that they are so ugly as they are so simple they very rarely go wrong and in fact would continue for another forty years. Our one was in its fifties and still going strong we found out! 

We decided to have the boiler and delightful surround pulled off and the wall, the new boiler put into the loft and the hot water tank in the giant airing cupboard in our bedroom removed with new piping installed. We needed this done prior to the extension beginning so we knew where the pipes would be to box in so two weeks ago with a two day slot our plumber arrived. 


We could never use this room for anything other than a living space all the while the back boiler was here as you cannot sleep in a room where there is one incase of carbon monoxide poisoning. We have CM alarms but I still wouldn’t take the risk. In the build this room will become two so we needed the boiler gone.

We were left however with a bit of a dilemma. We didn’t want to spend loads of cash on making the fireplace beautiful as it’s likely when the build is done we will want to change it or it will get filthy with dust so we blocked up the open hole with insulation and made a wooden square to go over the top of it. It sounds awful and to be honest looked a bit odd but did somewhat resemble a fireplace. The hearth stayed in place. It occurred to me that we could quite easily paint a surround with limited cost (we have lots of chalk paint) and then give the illusion of having a fireplace without actually having one.


So I painted the wooden panel, the hearth and a surround with chalk paint in ‘charcoal’ that I got from Aldi. I then waxed everything other than the wooden panel so it was a slightly different shade than the surround and hearth. I did manage to get some paint on the carpet but that’s a lot better than I usually manage! 

Karl then cut me lots of tiny circles from logs of wood. All in slightly different sizes and ever so irregular. There are some that are shaped a little bit like hearts, different colours and none of them in anyway uniform. I then used wood glue to stick them onto the wooden panel to look like a stack of logs in an open fireplace. 


All of this cost £2 for the panel of wood that Karl cut to size, nothing for the logs that were cut down as we already had them in the wood store, £4.99 for some chalk paint and I used Annie Sloan wax that I already had for the waxing afterwards. The wood glue was a tube from B&Q that we already had. 

It may not be to everyone’s taste and the Dark is taking me a while to get used to but I absolutely love the results. It looks like it was done by someone far more professional than me and my old paint brush and Karl got to use his big chopper which always excites him massively. 

I would love to hear what you think and more importantly cheap ways you have used to upcycle your home.

Have a fab weekend, Lucy xxx